|
Are you tired of having dull and lifeless photos in your collection? Do you want to add a pop of color to your pictures? Well, you have come to the right place. In this article, we will share some simple and quick techniques that can help you colorize your photos and make them stand out.
Use Color Filters One of the easiest ways to add color to your photos is by using color filters. Most photo editing software comes with a range of filters that can add a specific color tone to your image. For instance, you can use a warm filter to add a yellow or orange tint to your photo, or a cool filter to add a blue or green tone. Experiment with different filters until you find the one that works best for your photo. Adjust Color Balance Color balance is another important aspect of adding color to your photos. Sometimes, your photos may appear too warm or too cool, which can affect the overall color tone. To adjust the color balance, you can use the color balance tool in your photo editing software. This tool allows you to adjust the levels of red, green, and blue in your photo to create a balanced color tone. Enhance Color Saturation If you want to make the colors in your photos more vibrant, you can enhance the color saturation. This can be done by increasing the saturation levels in your photo editing software. However, be careful not to overdo it as it can make your photo appear unrealistic. Use Selective Color Selective color is a technique where you highlight specific colors in your photo while desaturating the rest. This can create a dramatic effect and make your subject stand out. To use selective color, you can use the selective color tool in your photo editing software. Add Color Gradients Color gradients are a great way to add a smooth transition of color to your photos. This technique involves blending two or more colors in a gradient pattern. You can use the gradient tool in your photo editing software to create a custom gradient and apply it to your photo. Use Color Overlay Color overlay is a technique where you add a semi-transparent layer of color to your photo. This can create a subtle color tone and add depth to your image. To use color overlay, you can create a new layer in your photo editing software and fill it with a color of your choice. Then, adjust the opacity level to create the desired effect. Colorizing Your Old Photos with MemoryCherish Bringing an old photo to life can be a great way to preserve memories and share them with your loved ones. MemoryCherish is a revolutionary tool that helps you do just that – colorize your black-and-white photos quickly and easily. With just a few clicks, you can transform an image from the past into something vibrant and memorable. Here’s how it works: 1. Select the photo you want to colorize and upload it to the MemoryCherish platform. 2. The tool will use advanced AI algorithms to automatically colorize your photo. 3. You can also make manual adjustments if you want more control over the colors in your image. 4. Once you are satisfied with the result, you can download the colorized photo and share it with your friends and family. Whether you’re looking to add a splash of color to your photos or bring an old memory back to life, MemoryCherish is a great tool that can help you achieve this quickly and easily. So what are you waiting for? Try it today and make your photos come alive! In conclusion, adding color to your photos can make them look more vibrant and visually appealing. By using these simple and quick techniques, you can colorize your photos and make them stand out. So, next time you take a photo, remember to experiment with different color techniques to create a unique and stunning image.
0 Comments
 Do you have boxes of old photos that need to be scanned? Or maybe you just want to digitize your current collection of photographs. Whatever the reason, scanning photos can be a great way to preserve and share memories with family and friends. But in order for the scans to look as good as possible, it’s important to choose the right resolution. In this article, we will provide an overview of what resolution is best when scanning photos so that your digital copies look sharp and clear. We’ll also discuss how different resolutions affect file size and storage needs, so you can make sure your digital photo library isn’t taking up too much space on your computer or hard drive. Read on for all the details!
Why Scanning Photos is Important Scanning photos is an important part of preserving memories. By converting physical images into digital files, you can store them for posterity and easily share them with other people. Having digital copies of your photos also makes it easier to create artwork from multiple images, such as photo collages or photo montages. Furthermore, by scanning your old photos you can restore them to their original look and feel - some even have the ability to remove scratches and dust marks that have built up over time. Additionally, scanning your photos allows you to back them up onto multiple devices in case one fails, so that your precious memories are never lost or forgotten. All these factors combine to make scanning your photos a valuable endeavor that helps ensure those special moments are kept safe for years to come. What is Resolution and How Does it Affect Scanned Photos Resolution is a measurement of the detail an image holds, and it is expressed in dots per inch (DPI). The higher the resolution, the more detail an image will contain. When scanning photos, choosing a higher resolution will result in scans with greater clarity and sharper details. Low resolution photos may appear blurry and lack definition, while high resolution images can be zoomed in without losing quality. It’s important to remember that as resolution increases, file size also increases - so it’s best to choose a resolution that strikes a balance between image quality and file size. For scanned photos, a 300 DPI or higher provides good quality reproduction for printing or viewing on electronic devices such as computers or tablets. Scans at 600 DPI are even better for capturing very fine detail in your photographs such as text or intricate patterns. This is especially important for archiving purposes because you may want to be able to zoom in on certain features of a photograph without sacrificing its overall sharpness. Benefits of Choosing a Photo Scanning Resolution 1. Preserving Memories: Scanning photos allows you to create digital copies of your physical images, so that they can be stored for posterity and easily shared with family and friends. 2. Restoring Photos: By scanning old photos, you can restore them to their original look and feel - some even have the ability to remove scratches and dust marks that have built up over time. 3. Backup Options: Scanning your photos also provides an easy way to back them up onto multiple devices in case one fails, so that your precious memories are never lost or forgotten. 4. Quality Reproduction: Choosing a resolution of 300 DPI or higher when scanning photos will result in scans with greater clarity and sharper details, making it ideal for printing or viewing on electronic devices such as computers or tablets. Scanning Old Photos With MemoryCherish Scanning old photos with MemoryCherish is a great way to preserve your precious memories. MemoryCherish provides high resolution scanning of your physical images, so that they can be converted into digital files and stored for posterity. With resolutions up to 600 DPI, you can be sure that all the details in your photos are captured and won’t be lost or forgotten. Not only will your scans look sharp and clear, but MemoryCherish also has the ability to remove dust marks, scratches, and other damage caused by time - so you can restore old photos to their original look and feel. What’s more, since it supports multiple backup options, you can make sure your photos are securely stored in case of technical difficulties or device failure. So if you’re looking for a reliable way to scan your old photos and keep them protected for generations to come, MemoryCherish is an excellent choice. Summary: Scanning old photos is an important endeavor for preserving special memories for generations to come. Choosing a resolution of 300 DPI or higher when scanning photos will result in scans with greater clarity and sharper details, making them suitable for printing or viewing on electronic devices. MemoryCherish provides high resolution scanning of physical images, allowing them to be converted into digital files with resolutions up to 600 DPI, capturing all the fine details in the photos. Furthermore, MemoryCherish is able to remove dust marks, scratches, and other damage caused by time, restoring old photos back to their original look and feel. With multiple backup options available, you can be sure that your precious memories are securely stored even in case of device failure. 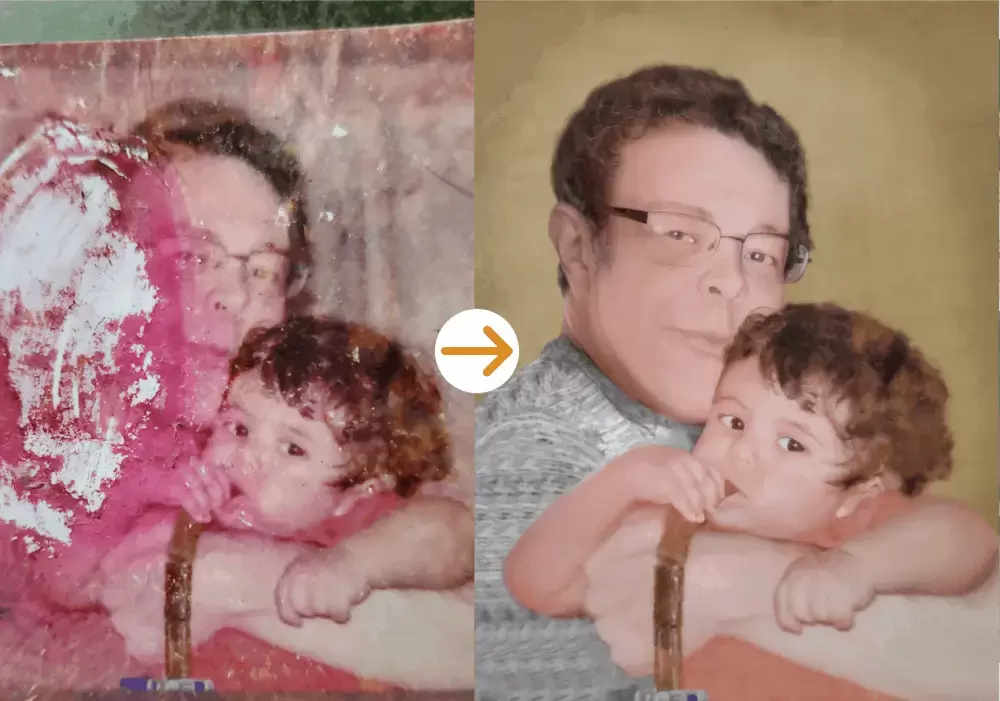 Do you have a treasured family photo that has been damaged over time? Are you looking for ways to restore it digitally and preserve the precious memories associated with it? If so, then this blog post is just what you need!
In this blog, we’ll discuss how to digitally restore a photo. We’ll start by talking about why restoring photos is important, before going into detail on the best techniques for achieving a successful restoration. Lastly, we’ll provide some useful tips to help ensure your restored photo looks as good as possible. So read on to find out more! Why Restore Photos? Photos are an important part of family history and can trigger happy memories when viewed. Sadly, however, they can also be easily damaged over time due to fading or tearing from age or mishandling. Restoring these photos digitally can not only bring them back to life but also help preserve them in their original condition for future generations. Additionally, digital restoration offers many advantages over traditional methods such as being less expensive and much faster than having a professional do the repair work manually. The Best Techniques For Digital Photo Restoration When it comes to restoring photos digitally there are several techniques you can employ. Let's look at some of the most effective and reliable ones: • Repairing tears or cracks in photos: Using a digital retouching program such as Photoshop, you can carefully remove any tears or cracks from your photo to restore it to its original condition. • Removing dust and dirt spots: Blurring or cloning out any unwanted dust and dirt spots is another great way to digitally restore a damaged photo. • Brightening dark areas: If parts of your picture have become too dark over time, then a digital filter may be able to help lighten them up again for better clarity. • Color correcting faded images: When an image has lost color due to age or overexposure, you can use a digital color correcting program to bring back some of the lost hues. • Cropping images: Using an image editing program such as Photoshop, you can also crop and resize photos to remove unwanted elements from the frame and make them look better. Tips For A Successful Restoration Once you’ve decided on which techniques to use for restoring your photo digitally, here are some tips for getting the best possible results: • Start by scanning your photo at a high resolution so that there is enough detail for restoration work. • Work slowly and carefully when applying any changes – take time to inspect the progress regularly throughout the process. • If possible, try to use the original photo when making changes as it’s easier to match colors and tones. • Be sure to save your work regularly in case of any technical issues. • When you’re done with the restoration, export your photo in a format that is easily printable and shareable. Conclusion: Digital photo restoration is an important skill to have if you want to preserve your family memories for years to come. With the right techniques and tools, you can restore any damaged photos back to their original condition in no time. By following our tips above and taking your time when making changes, you’ll be able to make sure that your restored photo looks as good as possible! MemoryCherish provides a comprehensive solution for digital photo restoration so don't hesitate - start preserving those precious moments today! |
AuthorWrite something about yourself. No need to be fancy, just an overview. Archives
June 2023
Categories |
 RSS Feed
